Updated: 09/12/00
C-cars came with three different wheel and tire combinations, 480x12, 125/80R12, and 135/80R13. The early Citicars came with the 480x12 trailer tires and 4-inch wide wheels. Later Citicars and some Comuta-cars came with the 125/80R12 tires. Other Comuta-cars came with 135/80R13 tires and 4.5-inch wide wheels.
The 480x12 trailer tires are the only kind still commonly available in the United States. They are cheap and available everywhere. The ride and handling is poor. If you were restoring an early Citicar, these would be your choice. If you plan on driving your Citicar much, don't bother with them.
The 125 and 135 radials are almost impossible to find. 145 and 155 sizes are available but clearance can be a problem. Even the 135/80R13 rubbed on some Comuta-cars.
If you want an acceptable ride and handling, you need radials. Outside diameter needs to be as close to 20 inches as possible. 21 inches will work. 22 inches will rub badly. The wider the tire, the smaller the diameter needs to be to avoid rubbing. The following lists some typical tire diameters (varies some by manufacturer):
| C-car tire possibilities | ||
| Size | Outside diameter | Comments |
|---|---|---|
| 480x12 | 20.00 inches | early Citicar, poor ride and handling |
| 125/80R12 | 19.94 inches | later Citicar, Comuta-car, unavailable |
| 135/80R12 | 20.58 inches | unavailable |
| 145/80R12 | 21.21 inches | Sears - $15 |
| 155/80R12 | 21.84 inches | rubs |
| 135/80R13 | 21.58 inches | Comuta-car, Coker tire - $75 |
| 145/80R13 | 22.21 inches | rubs |
| 155/80R13 | 22.84 inches | rubs bad |
| 105/80R13 | 19.67 inches | space saver spare, available at junkyards |
| 125/80R13 | 20.87 inches | space saver spare, can't find source |
| 175/50R13 | 19.95 inches | small diameter, good handling |
Rubbing can occur against the aluminum tubes running across the firewall. If the tire rubs there, the best thing you can do to remedy the problem is to use a smaller tire diameter. There can be significant variation from car to car and even from side to side on the same car. It is also possible to bend the tubes back about .25-.50 inches for a little more clearance. Unless your tire is over 22 inches in diameter, it will only rub in tight turns. The fender lip is another area where the tire can rub. The fender lip interference is easy to fix. The lip that bends under is sometimes uneven. It varies from .5 to .875 wide. A file can be used to even it out and eliminate the interference. A lip that extends only .5 to .625 inches doesn't usually rub on the tire.
The 145/80R12 is often available from Sears as a Guardsman Radial (only $14 each last time I checked). It measures about 21 inches in diameter. Rubbing should be minimal. It would be worth trying if you have 12-inch wheels. Sears sometimes carries name brand tires in the same size but they actually measures a little bigger than the low cost Guardsman. I run some older Yokohama 145/80R12 tires on my orange Citicar and they ride and handle fair.
This space saver spare can be used on 13-inch wheels. New ones are over $100 each. The wrecking yard is a good source for these tires. I found a matched set of four. Mine all came from Honda Civics and cost $15 each. The Ford Festiva is another common car to look for. Since these tires rarely get used and were protected in the trunk of the car, they were like new. The 13-inch Comuta-car wheel is .5 inches wider than the Honda spare but the tires still mounts OK. The handling is not as good as the wider tires but they seem to roll easily. They run at 60 psi so should have low rolling resistance, though at that pressure, the ride is rough. They are not rated for long use. But the C-cars are light, and can't exceed the tire's 50 mph limit so wear has not been a problem.
I drove on the tires for several hundred miles to evaluate them. The ride was not as bad as I thought it would be. The fact that there is less unsprung weight helps the ride. Each wheel and tire weighs 19 lbs. while the Vega wheels and 175/50R13 tires weigh 29 lbs. each. I put over 46 non-stop indicated miles on a full charge. The stock tires are 10% larger in diameter so the indicated speed and distance must be adjusted down 10%. Half of the trip was at about 45 mph on the open road and the other half was 20-30 mph of driving in a residential area. The batteries had sagged during the last mile to where I could only reach about 30 mph. I have never gotten over 40 miles with the wider 175/50R13 tires. The 105/80R13 do not rub at all, even in the worst of bumps and turns.
This space saver spare can be used on 13-inch wheels. It should a be a perfect fit with low rolling resistance. But new ones are over $100 each and I was only able to find one at the wrecking yard. If I can find out what it came off of, I will look for more.
The 175/50R13 turned out to be readily available and had the right diameter. One problem - it was 2 inches wider than the 125/80R12. I took some careful measurements. By using a rim of the correct width and offset, it should fit.
The most difficult part was yet to come. I had to find wheels that would fit the C-car bolt pattern and offset while allowing the wider tires.
I tried many trailer outlets and manufacturers. Nothing wide enough. I needed at least 5.0 inches wide. Having the wheels widened at a wheel specialty shop would cost $80/each. I would have to find another solution. The C-car has a 4 x 4-inch bolt pattern on the wheel. Most of the custom wheels that I found were 4 x 100 mm which is not close enough. I did find some from J.C. Whitney but they had the wrong offset. I searched the net and found a list of cars that originally had a 4 x 4-inch bolt pattern. There were not many but among them were:
Austin-Healy Sprite - allThe GM cars, especially the Vegas, were common at one time. I did find several L-body cars at local wrecking yards. Some research showed that there were both 13 x 5.0 and 13 x 6-inch wheels available on these cars. The offset looked close enough. The Vega GT had the 6-inch wide wheels and it was a common model. I found a Monza/Vega wrecking yard in PA that had 4 decent Vega GT wheels. If you find some wheels, make sure the tire bead seat and lug nut seats are good. The wheel bearing dust covers on the front hubs fit tight inside the center hole of the front wheels. The GT wheel has a smaller diameter center hole than then non-GT, GM wheels. You need to enlarge the hole slightly for clearance. You can do this by hand with a half round file, or use a small grindstone in a power drill or die grinder. Do the rear wheels also so that they can be rotated with the front tires when needed.
I took the Vega GT wheels down to the Tire Store and had Remington 175/50R13 tires mounted. I then mounted the wheels to the car. Less rubbing than stock tires. They can still contact the fender lip in a tight turn. The inside top edge of left rear tire can rub the trunk floor in a hard bump. The front tires come very close to the leaf springs in a tight turn. The ride and handling are great (at least compared to a stock C-car). The rolling resistance feels greater than the stock tires. It calculates to be lower than the stock tires. These tires work well but are a little wide for the C-cars.
I will look into other wheels as time permits. A 5.0-inch wide wheel with about 3.25-inch backset would be best for clearance. The Vega GT wheels do not rub the fire wall and frame like the stock wheels but they can contact the fender lip a small amount when locking the steering wheel in a hard turn. The Citicar has a tighter turning radius than the Comuta-car. The 175/50R13 on a Vega GT wheel will rub the front leaf springs in a tight turn on a Citicar. The 5.0-inch wide and the non-GT, 6-inch wide wheels do not need the bearing cap modification like the GT wheels. I like the looks of the GT wheels better but you can use either. The C-car hub caps will not fit the GM wheels but most standard hub caps will. The GT is a styled wheel and uses a trim ring instead of a hub cap.
Get the wheels sans trim and save some money. If you get the GT wheels, paint them yourself to match your car and add chrome lug nuts. If you get the non-GT wheels, use the original GM wheel covers or use some after market chrome wheel covers.
Tires of the same rating from different manufacturers do not always measure the same width. The Dunlop and Remington tires measure 6.1 inches wide while the BF Goodrich Euro T/A measures 7.2 inches wide. The narrower tire will work better.
Tire manufactures for 175/50R13:
Remington - XT-120
Sumitomo - HTR100
Dunlop - GT Qualifier
BF Goodrich
- Euro T/A
Nitto - NT 505
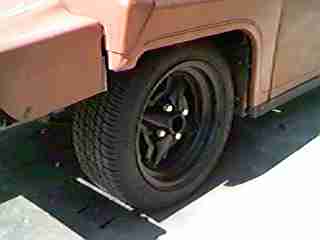
The above image shows the Vega GT wheel mounted on a 1980 Comuta-car. The tire is a Remington 175/50R13.
The most economical solution will depend on your wheel size. For 12-inch wheels, try the 145/80R12 Sears Guardsman. If you have 13-inch wheels, try to find four of the 105/80R13 spare tires at a wrecking yard (125/80R13 space savers would be ideal if you can find them). If you are willing to replace the wheels and looks and handling are more important than cost, get some GM wheels and 175/50R13 tires.
One the most troublesome parts of the C-car was the speed controller. Good driving habits can extend the life of the stock controller. Since the C-car was originally designed, reliable electronic controllers have become readily available. The correct controller selection will make the C-car almost a pleasure to drive.
The original contactor controller has one thing going for it - no current limit lets you jump off the line and pull any hill. But, that same lack of current limit is hard on components and can cause burned contacts, burned brush leads, burned out motors and more. Switching to an electronic controller results in smooth throttle action and power delivery, regardless of how you push the pedal.
The Curtis controller is one of the most popular and readily available. They make several models that can be used in the C-car. You need at least 400 amps to get performance close to the original. You could get by with 350 amps and it is easier on the motor. 500 or 550 amps will match the performance of the original contactor controller. 400-500 amps seem high for such a small car but you only have one gear. You need fairly high current for starting, especially on hills. The current falls off quickly as the RPM increases so normally the motor does not overheat. If you maintain the high current for any length of time, you will burn up the brushes.
| Possible Curtis controller candidates for 48-volt systems | ||
| Model | Voltage | Current |
|---|---|---|
| 1205-201 | 36-48 volts | 350 amps |
| 1209B-55XX | 36-48 volts | 450 amps |
| 1209B-6402 | 48-72 volts | 400 amps |
| 1209B-6A5XX | 48-80 volts | 450 amps |
| 1221B-57XX | 36-48 volts | 550 amps |
| 1221B-66XX | 48-72 volts | 500 amps |
| 1221B-6A7XX | 48-80 volts | 550 amps |
My Citicar has the 1209B-6402. It has fair power and most dealers stock this model. It will also allow for pack voltage upgrades in the future. It is a little slow on pick up for the first 20-30 feet but accelerates well after that.
I had to special order the 1221B-6A701. It has 550-amp capacity and it goes down to 48 volts. It can also handle up to 80 volts. I am upgrading my brown Comuta-car to 12 x 6V for 72 volts and up to 50% more range.
Until there is a good controller with regenerative braking available for this current and voltage level, I recommend the Curtis 1209B-6402 for most situations or the 1221B-6A701 for situations where maximum power is required. With the 1221B-6A702, you have to drive with some restraint on the throttle to prolong brush life. Just avoid frequent full throttle starts.
The Curtis doesn't have built in regen but it does have plug braking. I recommend that you wire it even if you don't intend to use it. The C-cars have electric reverse. All you need to do is hook up one more high current wire from the motor A2 to the controller A2. I wire the controller A2 to the A2 connection on the reversing contactor rather than straight to the motor.
There are two reasons to wire the plug braking, both of them for safety. The first reason is that it gives you at least some capability to stop if your brakes should fail. But the most important reason is if you don't wire it up, and you change the reverse switch direction while moving, then touch the throttle, the motor will suddenly lock up and the car will start an uncontrollable skid. That was as much testing as I would do! Curtis does not recommend plug braking for on-road vehicles. You do not have to use it, but wire it up anyway. Not connecting it can be unsafe.
If you really need to use the plug braking feature, just lift off the throttle, engage reverse and then reapply the throttle. The car will brake smoothly to a stop and then start to go normally in reverse. Most Curtis controllers have progressive plug braking where more throttle gives more braking. You get very little braking at high speeds with the factory settings. The plug braking rate is adjustable on the controller, but I have not tried changing it.
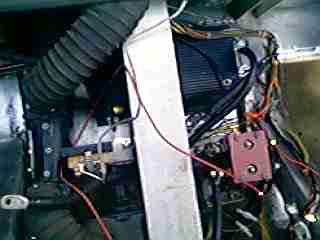
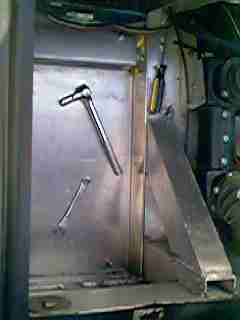
The above image shows the Curtis 1221B mounted in a 1980 Comuta-car. The original C-car contactors look crude and there are suitable replacements available. I chose to retain the original contactors. I reasoned that if they had any kind of life while switching the full current on and off in their original job as a series/parallel controller, they should have an easy time when used with the Curtis controller. The forward/reverse contactor was left in it's original location. The S/P contactor was moved and configured with the two pairs of contacts in series as a main contactor. The two contacts in series provide a larger gap to better break the 72 volts that I planned for the next upgrade. If you intend to stay with 48 volts, you could wire the contacts in parallel to divide the current load between them.
Controller sources: KTA Services, Inc.The Citicar came with 4-gauge wire on the high current side and the Comuta-car came with 2-gauge wire. I assume it was to act as some kind of current limiter so you don't blow the fuse or motor brushes every time you floor it.
The wire should be upgraded if you change to an electronic controller. The controller will limit the current so you want as little resistance as possible in the wire. I use 1/0 gauge welding cable for short connections such as those between batteries where space is tight or extra flexibility is needed and 2/0 gauge on longer cables.
The connectors should have a good crimp and then seal with heat shrink tubing. You can use alternator boots to cover the connections on the motor.
From my own experience, the stock Comuta-car has a top speed of about 35-40 mph on level ground. The range is about 25 miles of stop and go driving or 40+ miles on a straight road. The range has been adequate for me but I need to go a little faster. With the 175/50R13 tires, the Comuta-car has the stability to handle higher speeds. The Curtis controller that I use can handle up to 80 volts, which should be more than adequate to achieve 50 mph.
Several battery configurations were considered. The newer 8-volt batteries are the same size and weight as the 6-volt batteries in the Comuta-car. They would give 64 volts, the same range, and require no chassis modifications. If I didn't have a bunch of 6-volt batteries already, the 8-volt batteries might have been my first choice. I also had a 120/240-volt off-board charger rated at 72/12-volt output.
The components on hand drove my design choices but they would be good choices regardless. I could remove the two on-board chargers (12-volt and 48-volt) and relocate the group 24 accessory battery. This would give me room for 4 more 6-volt batteries but it would require cutting the floor under the seat and installing some recessed battery trays. The older Citicars use this same location to mount 4 of it's batteries.
|
|
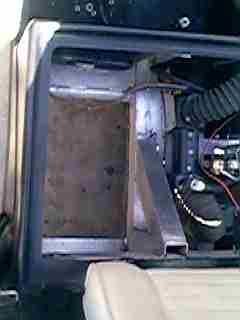
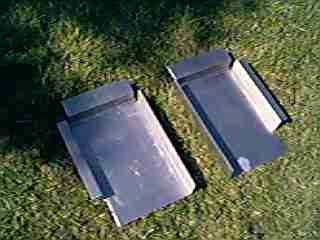
The above images show under the left and right seats of a 1980 Comuta-car with two sections of aluminum plate cut out. |
|
Left and right battery trays were designed to bolt in. They are .125-inch aluminum. A local CNC sheet metal shop cut and formed them at a cost of $90 for the pair.
Aluminum was chosen since it is used for the C-car frame/chassis. Stainless steel hardware was used to fasten the trays in place.
|
|
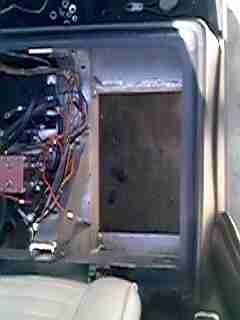
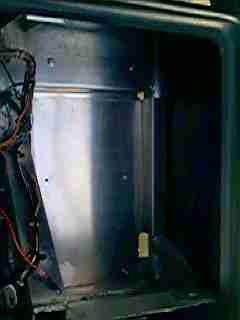
The above images show under the left and right seats of a 1980 Comuta-car with two new battery trays installed. |
|

The above image shows four more batteries installed in the Comuta-car for a total of 72 volts.
I have recently been testing the 72-volt Comuta-car and am pleased with the results. It is still not a freeway car but I don't hesitate to take it on roads with a 50-55 mph posted speed limit. It does an even 50 mph on perfectly flat roads with full batteries. It pulls hills faster than before but I'm still being cautious pulling over 200 battery amps for any length of time.
Note: I put over 500 miles on the upgrade with no problems. I let someone else use the car and the brushes burned up. It could be a coincidence but I asked what the ammeter indicated on the long hill they had to climb and they didn't know. I replaced the brushes and ran them for over 1000 miles before they started to get very brittle and crumble. I switched to a better type of brush and turned the current limit on the controller down to 400 amps from the factory 550-amp setting. A smaller 400-amp controller might be the best choice after all.
The Comuta-car has a slightly longer wheelbase than the older Citicar. With the new tires, it is stable at 50 mph on most roads and stable at 55 mph on smooth roads. Even so, it is a very small car. Unless you are more daring than usual, 50 mph is a practical maximum speed. Since I decided to go a little lighter on the throttle to save the motor, I plan on trying the 60-psi space saver spares on suitable wheels to maximize range while giving up some handling performance.
The car is about 220 lbs. heavier than before the controller and battery upgrade. It seems to ride smoother now but it still bounces some. There might be better shocks available somewhere. The brakes work fair as before. The brakes and shocks are areas that I plan on looking into for future improvements.
| Design Pacifica |