Drawing Annotation
Annotation in SI Mechanical is based on industry
drafting standards. The standard used in the drawing is set by the
STANDARD DPVAR variable.
TAGMODES Command
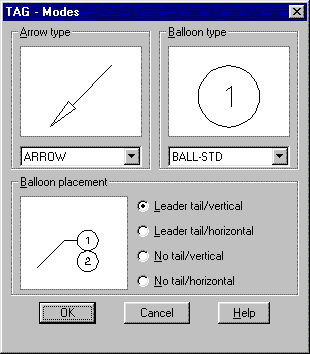
The TAGMODES command is used to set options that affect dimension
lines, leaders, leader tags, and balloon styles.
Command: tagmodes
A dialogue box similar to the following figure is displayed:

- Arrow type
- This image button and pop-up list is used
to set the AutoCAD DIMBLK variable to one of several common types,
including ARROW, DOT, FOOT, STRAIGHT, and TARGET. FOOT and TARGET
are used for geometric tolerancing leaders, while arrows are used
for dimensions. FOOT is used with the Leader TAG-GEODIM-DFS option,
and TARGET is used with the TAG-GEODIM-DTS option.
- Balloon type
- This image button and pop-up list is used
to set the SI Mechanical BALLBLK system variable to one of several
common types, including, round (BALL-STD), triangle (BALL-TRI), ellipse
(BALL-ELP), number only (BALL-NON), and square (BALL-SQR).
- Balloon placement
- This image button and button group is used
to set the SI Mechanical BALLTAG system variable to control placement
of balloons on leader tags. You can set it for horizontal or vertical
placement and with or without a leader tail.
TAG Command
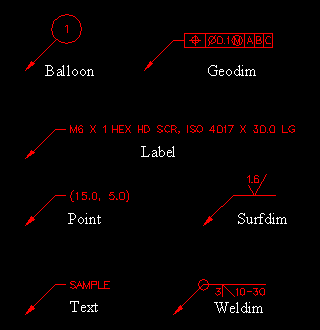
The TAG command draws a general purpose leader and attaches one of
many items at the end of the leader. The large variety of uses make
it a very powerful command. It can access commands such as
BALLOON, GEODIM, LABEL, WELDIM, and SURFDIM. It can also be terminated
with an ordinate point or plain text.
The TAG command sequence begins like this:
Command: tag
Leader start: Pick point.
If you press [Enter] in response to the leader start prompt, you can
preselect the type of tag you want at the end of the leader; otherwise,
you are asked for the type of tag when the leader is complete.
Balloon/Geodim/Label/Point/Surfdim/Text/Weldim/<default>:
For information on Balloon, Geodim, Label, Surfdim, Text, and Weldim,
see the appropriate SI Mechanical command.

Point Option for TAG Command
The Point option draws the dimensions of the point which the start
of the leader is touching. The X and Y coordinates are always shown.
The ZPOINT DPVAR variable can be set to
1 to include the Z coordinate, or to 0 to exclude it.
BALLOON Command
The BALLOON command inserts a part identifier balloon. The
APTLST command uses the information in the balloons to automatically
create a parts list on the drawing format. The BALLOON command prompts
you to select a database item.
Command: balloon
Select entity <none>:
The entity can be any item created with the HARDWARE command, a shaft item
with appropriate data fields, or a block with appropriate attributes. Any
field names in the database that match field names in the balloon will have
their values automatically added
to the balloon. The TAGTRANS table can be used to translate non-standard
attributes into SI Mechanical balloon attributes. If no data
is found or no item is selected, you must manually enter the values.
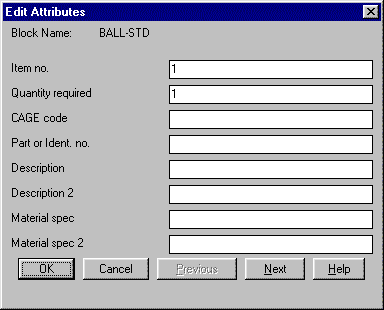
After the balloon is inserted, the Edit Attributes dialogue box is
displayed. The AutoCAD DDATTE command can be
used to edit balloon tags after insertion.

GEODIM Command
The GEODIM (GEOmetric tolerance DIMension) command inserts geometric
tolerancing symbols. The rules governing the creation of the symbols
are built into the program to insure that only valid symbols are created.
The initial form of the symbol is controlled by settings in the GEODIM
database table and by several DPVAR variables.
Command: geodim
DFS/DTS/FCF/PTS/<default>:
Insert point <options>: Pick point.
Change symbol? <N>:
GEODIM options
| Option | Symbol | Description |
| DFS |
 |
Creates a Datum Feature Symbol |
| DTS |
 |
Creates a Datum Target Symbol |
| FCF |
 |
Creates a single or composite Feature Control Frame |
| PTS |
 |
Creates a Projected Tolerance zone Symbol |
Inserting a GEODIM Symbol
DFS, DTS, FCF, and PTS all work the same way. After entering
the desired option, you are prompted for the insert point. If you
press [Enter], GEODIM displays an appropriate dialogue box for
the selected option.
All options except DTS allow different justifications
for the symbol. A pop-up list labeled Justify:
will be present.

FCF Option for GEODIM Command
The FCF option displays the Feature Control Frame dialogue box. You
can convert between single, composite, and stacked frames inside the dialogue
box.

The dialogue box shows a preview of the tolerance symbol. The pop-up
list lets you pick the feature symbol. Depending on the symbol picked,
various buttons will be activated. When a button is grayed out it
indicates that the option is not valid for the current symbol settings.
Feature symbols
| Selection | Symbol |
| ANGULARITY |
 |
| CIRCULARITY |
 |
| CONCENTRICITY |
 |
| CYLINDRICITY |
 |
| FLATNESS |
 |
| PARALLELISM |
 |
| PERPENDICULARITY |
 |
| POSITION |
 |
| PROFILE-LINE |
 |
| PROFILE-SURFACE |
 |
| RUNOUT-CIRCULAR |
 |
| RUNOUT-TOTAL |
 |
| STRAIGHTNESS |
 |
| SYMMETRY |
 |
- Spherical
- This check box determines whether to include
a spherical diameter symbol in the tolerance.
- Diameter
- This check box determines whether to include
a diameter symbol in the tolerance. The diameter symbol indicates
that the tolerance applies to a circular zone.
- Single
- This button determines whether a single tier
feature control frame will be created. The First tier
column is always available. The Second tier
options are not available with this setting.
- Composite
- This button determines whether a composite
feature control frame will be created.
- Stacked
- This button determines whether a stacked
feature control frame with duplicate symbols will be created.
- Tolerance
- This group contains an edit box for entering
the tolerance and buttons to select the tolerance modifier.
- STatistical tolerance
- This check box determines whether to include
a statistical tolerance symbol in the frame.
- Free state
- This check box determines whether to include
a free state symbol in the frame.
- Tangent plane
- This check box determines whether to include
a tangent plane symbol in the frame.
- Projected tolerance zone
- This check box determines whether to include
a projected tolerance zone symbol in the frame. The zone length can
be entered in the adjacent edit box
- Optional text
- This edit box lets you enter optional text
to include after the tolerance modifier.
- Primary datum
- This group contains a combination list box
and edit box for setting the primary datum reference, and check boxes
to select a primary datum modifier.
- Secondary datum
- This group contains a combination list box
and edit box for setting the secondary datum reference, and check
boxes to select a secondary datum modifier.
- Tertiary datum
- This group contains a combination list box
and edit box for setting the tertiary datum reference, and check boxes
to select a tertiary datum modifier.
The tolerance and datum reference modifiers each have two exclusive
check boxes.
Tolerance and datum modifiers
| Check | Modifier | Description |
| M | MMC | Maximum Material Condition |
| L | LMC | Least Material Condition |
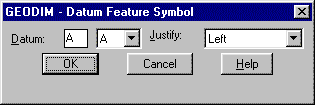
DFS Option for GEODIM Command
The DFS option displays a dialogue box similar to the following figure:

- Datum
- This edit box and pop-list sets the datum
identifier. Standard identifiers are available in the pop-up list.
Any other valid identifier can be entered into the edit box.
DTS Option for GEODIM Command
The DTS option is normally used with the TAG command. However, you
can use it with the GEODIM command to create a symbol without a leader.
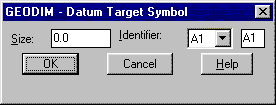
The DTS option displays a dialogue box similar to the following figure:

- Size
- This edit box indicates the size of the target on the physical part. The value is displayed in the
upper portion of the symbol. A value of 0.0 will not be displayed
in the symbol.
- Identifier
- This edit box and pop-up list sets the target
identifier. This string is displayed in the lower portion of the symbol.
PTS Option for GEODIM Command
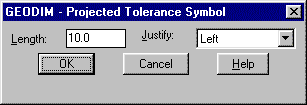
The PTS option displays a dialogue box similar to the following figure:

- Length
- This edit box sets the length value that will
be displayed inside the symbol.
The SYMCHG command can be used to change geometric
tolerancing symbols at a later time. See the SYMCHG and
SYMUPD commands for more information.
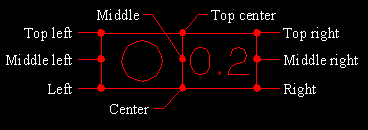
The symbols are created as a single entity. You can snap to many points
on the symbol including the insert point. If the symbol is exploded
it reverts back to the base entities. Once a symbol has been exploded
it cannot be edited with SYMCHG or SYMUPD.
See the following DPVAR variables that directly affect the GEODIM
command:
GEODAT,
GEOSYM,
GEOTGT,
GEOTOL,
GEOTSZ,
GEOPTS
BASICDIM Command
The BASICDIM (BASIC DIMension) command puts a
box around dimension text to indicate a basic dimension.
Command: basicdim
Select object: Do so.
BASICDIM
| Before | After |
 |
 |
Dimensions that have plus/minus or maximum/minimum
tolerances cannot be basic dimensions. BASICDIM does not
work on them.
WELDIM Command
The WELDIM (WELd DIMension) command inserts welding symbols.
Command: weldim
Insert point <options>: Pick point.
Change symbol? <N>:
All welding symbols are created using default values to set the initial
form. The symbol is changed by responding with [Enter] to the insert
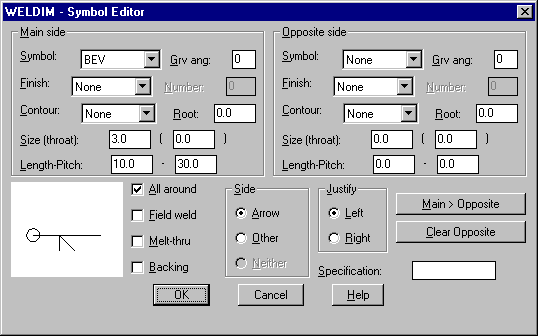
point prompt or [Y] to the change symbol prompt. A dialogue box similar
to the following figure will be displayed:

The Main side and Opposite side
groups are similar. Depending on settings in the Main
side, the Opposite side may be grayed
out. The dialogue box shows a preview of the welding symbol.
Symbol
This pop-up list sets the weld symbol type.
Weld symbols
| Selection | Symbol | Description |
| BACKING |
 |
Backing weld |
| BEV |
 |
Bevel weld |
| COR-FLG |
 |
Corner flange weld |
| EDGE-FLG |
 |
Edge flange weld |
| FIL |
 |
Fillet weld |
| FLARE-BEV |
 |
Flared bevel weld |
| FLARE-V |
 |
Flared V weld |
| J-GRV |
 |
J groove weld |
| PLUG |
 |
Plug weld |
| SCARF |
 |
Scarf weld |
| SEAM |
 |
Seam weld |
| SPOT |
 |
Spot weld |
| SQ |
 |
Square weld |
| STUD |
 |
Stud weld |
| SURF |
 |
Surface weld |
| U-GRV |
 |
U groove weld |
| V-GRV |
 |
V groove weld |
Grv ang:
This edit box sets the groove angle to display
in the symbol.
Finish:
This pop-up list sets the finish designation
for the symbol.
Weld finish designation
| Selection | Symbol |
| Chip |
 |
| Grind |
 |
| Hammer |
 |
| Machine |
 |
| Roll |
 |
| Unspecified |
 |
Number:
This edit box sets the number-of-welds integer
to be displayed on the symbol.
Contour:
This pop-up list sets the contour symbol that
will be displayed on the symbol.
Weld contour symbols
| Selection | Symbol |
| Concave |
 |
| Convex |
 |
| Flush |
 |
Root:
This edit box sets the value for the root
size that will be displayed on the symbol.
Size(throat):
These two edit boxes set the size and throat
values that will be displayed on the symbol.
Length-Pitch:
These two edit boxes set the weld length and
pitch values that will be displayed on the symbol.
Side
This group of buttons sets the side of the
material that the weld will appear on.
Weld side options
| Selection | Symbol |
| Arrow |
 |
| Neither |
 |
| Other |
 |
All around
This check box controls whether the all around
designation will be displayed on the symbol.
Field weld
This check box controls whether the field
weld designation will be displayed on the symbol.
Melt-thru
This check box controls whether the melt-thru
designation will be displayed on the symbol.
Backing
This check box controls whether the backing
designation will be displayed on the symbol.
Main > Opposite
This button transfers all settings and values
from the Main side group to the Opposite
side group. It will convert a single sided weld to a double
sided weld.
Clear Opposite
This button clears all settings and values
from the Opposite side group. It will convert
a double sided weld to a single sided weld.
Specification:
This edit box lets you enter optional text
to display on the symbol.
Justify
This pair of buttons controls the justification
of the symbol.
Weld symbol justification options
| Left | Right |
 |
 |
The SYMCHG command can be used to change welding symbols at a later
time. See the SYMCHG and SYMUPD commands for more information.

The symbols are created as a single entity. You can snap to many points
on the symbol including the insert point. If the symbol is exploded
it reverts back to the base entities. Once a symbol has been exploded
it cannot be edited with SYMCHG or SYMUPD.
See the following DPVAR variables that directly affect the WELDIM
command:
WELDALL,
WELDANG,
WELDBACK,
WELDCON,
WELDFIN,
WELDFLD,
WELDLG,
WELDMELT,
WELDNUM,
WELDOPP,
WELDPIT,
WELDROOT,
WELDSIZE,
WELDSPEC,
WELDSYM,
WELDTHRT
SURFDIM Command
The SURFDIM (SURFace DIMension) command inserts surface finish symbols.
Command: surfdim
Insert point <options>: Pick point.
Change symbol? <N>:
All surface finish symbols are created using default values to set
the initial form. The symbol is changed by responding with [Enter]
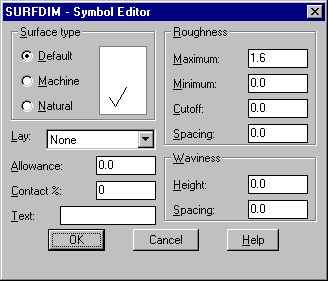
to the insert point prompt or [Y] to the change symbol prompt. A dialogue
box similar to the following figure will be displayed:

The dialogue box shows a preview of the surface finish symbol.
- Surface type
- This group of buttons sets the surface type
designation to display on the symbol.
Surface type options
| Selection | Symbol |
| Default |
 |
| Machine |
 |
| Natural |
 |
- Lay:
- This pop-up list sets the lay designation
that will be displayed on the symbol.
- Allowance:
- This edit box sets a value for material removal
allowance to display on the symbol. A value of 0.0 will not be displayed.
- Contact %:
- This edit box sets a value for the percentage
contact area to display on the symbol. A value of 0 will not be displayed.
- Text:
- This edit box lets you enter optional text
to display on the symbol.
- Roughness
- This group of edit boxes controls the display
of four different roughness values. Values of 0.0 will not display.
- Waviness
- This group of edit boxes controls the display
of the two waviness values. Values of 0.0 will not display.
The SYMCHG command can be used to change surface finish symbols at
a later time. See the SYMCHG and SYMUPD commands for more information.

The symbols are created as a single entity. You can snap to many points
on the symbol including the insert point. If the symbol is exploded
it reverts back to the base entities. Once a symbol has been exploded
it cannot be edited with SYMCHG or SYMUPD.
See the following DPVAR variables that directly affect the SURFDIM
command:
SURFAREA,
SURFLAY,
SURFMAXR,
SURFMAT,
SURFMINR,
SURFSPEC,
SURFTYPE,
SURFWAVH,
SURFWAVW,
SURFWIDC,
SURFWIDM
PHATCH Command
The PHATCH (Point HATCH) command hatches an enclosed area by picking
a point.
Command: phatch
Pick inside area <options>: Pick point.
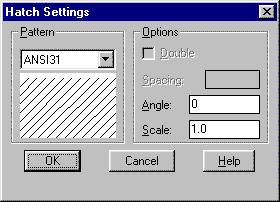
If you press [Enter], PHATCH displays a dialogue box similar to the
following figure:

The dialogue box allows you to set hatch parameters.
- Pattern
- This pop-up list sets the hatch
pattern. The standard AutoCAD hatch patterns are available. You
can also define your own.
- Double
- This check box sets the double hatch option
for user-defined patterns.
- Spacing:
- This edit box sets the line spacing for user-defined
hatch patterns.
- Angle:
- This edit box sets the hatch pattern angle.
Unless the pattern is user-defined, it is normally set to 0.0.
- Scale:
- This edit box sets the scale
for hatch patterns. It does not apply to user-defined patterns.
The SYMCHG command can be used to change the hatch pattern at a later
time. See the SYMCHG and SYMUPD
commands for more information. If the hatch pattern is exploded it
reverts back to the base entities. Once a hatch pattern has been exploded
it cannot be edited with SYMCHG or SYMUPD.
CNVTABLE Command
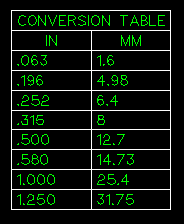
The CNVTABLE (CoNVersion TABLE) command draws a conversion table for
selected dimensions and text in the drawing.
It is the preferred method of showing alternate dimension units on
a drawing.
Command: cnvtable
Select objects: Do so.
Upper left corner of table: Pick point.

The conversion is based on AutoCAD dimension variable settings.
The variables are DIMALTD, DIMALTF,
and DIMAPOST. DIMALTD sets the decimal
places to show in the converted dimensions. DIMALTF sets the scale
factor to use for the conversion. If you are converting from inch
to millimeter, it should be set to 25.4, and if you are converting
from millimeter to inch, it should be set to 0.03937. DIMAPOST sets
a suffix string to add to the converted dimension.
EXLINE Command
The EXLINE (EXtension LINE) command draws an extension line between
two points and automatically provides the correct offset.
Command: exline
From reference point: Pick point.
To reference point: Pick point.

See the XLINEO DPVAR variable to control
the offset of the start point and endpoint of the extension line.
The DIMEXE AutoCAD system variable controls
the offset distance.
LABEL Command
The LABEL command is normally used inside the TAG command. The
LABEL command will label existing hardware, hole, and shaft
items created with SI Mechanical.
Command: label
Select object: Pick hardware, hole, or shaft.
Justify/Style/<Start point>: Pick point.
You can also specify a new justification or style prior to picking
a start point.
LONGBRK Command
The LONGBRK (LONG BReaK) command inserts a break symbol along a
line intended to show a part break.
Command: longbrk
Select line to insert break tag: Pick point on line.

SHFTBRK Command
The SHFTBRK (SHaFT BReaK) command draws a shaft break symbol between
two lines. Optionally, you can have it trim away the broken area.
Command: shftbrk
First point on diameter: Pick point on first line.
Opposite point: Pick point on second line.
Attempt shaft trim <Y>:

TXTTABLE Command
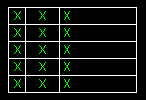
The TXTTABLE (TeXT TABLE) command draws a text table with user defined
rows, columns, characters per column, and column justification.
Command: txttable
Number of rows (---): Enter number.
Number of columns (|||): Enter number.
Number of characters in column 1, <1>: Enter number.
Justification of column 1, L/C/R/<L>: Enter justification.
Depending on the number rows and columns specified, the prompts for
number of characters per column and justification for each column
are repeated.
Number of characters in column X, <1>:
Justification of column X, L/C/R/<L>:
When all columns are fully defined, you are prompted to place the
table in the drawing.
Upper left corner of table: Pick point.

SLINE Command
The SLINE (Section LINE) command draws section
lines with section letters and arrow heads.
Command: sline
Section letter <A>:
From point: Pick point.
To point: Pick point.
To point:
To end the section line, press [Enter].
You can run SLINE with the ortho mode on to keep the lines straight.
SLINE ends with a break command so that you can break away the portion
of the section line that crosses the object. If a break is not needed,
you can press [Esc].

