In this session you will use the HARDWARE command to add items to
the flange drawing from Lesson Three. You can also create the hardware
as wire frame views. This session uses the pull-down menus primarily.
Optionally, you can type the commands at the Command: prompt.
- You will now use the HARDWARE command to add fasteners
to the drawing.
- Select the pull-down menu labeled SI-MECH.
- Select the Symbols - Parts item in the menu.
- Select the Hardware Options... item in the Symbols submenu.
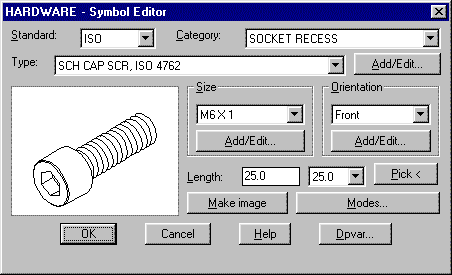
- The first item will have these parameters: Standard:
is ISO, Category: is SOCKET RECESS, Type
is SCH CAP SCR, ISO 4762, Size is M6 X 1, Length:
is 25.0, Orientation is Front.
Set all options in the dialogue box to specify the hardware according
to the following figure:
- Use the Modes... button to set the Model type to Solid.
- Pick the OK button to continue with the hole insertion.
- This is a solid model of a socket head cap screw. Enter
the insert point:
Solid, Front, ISO 4762, M6 X 1
Insert point <options>: 190,195,40
- Add another item except set the Category:
to NUT, Type: to HEX NUT, ISO 4034. Size:
to M6 X 1. Enter the insert point:
Solid, Front, ISO 4034, M6 X 1
Insert point <options>: 190,195,-150
- Add another item except set the Category:
to WASHER, Type to PLAIN WSHR, ISO 7089, Size:
to M6.4. Enter the insert point:
Solid, Front, ISO 7089, M6.4
Insert point <options>: 190,195,-135
- Use the AutoCAD ARRAY command to create a polar array
of the nut, screw, and washer items:
Command: array
Select objects: Select the three items.
Rectangular or Polar array (R/P) <default>: P
Center point of array: 210,160
Number of items: 6
Angle to fill (+=ccw, -=cw) h: [Enter]
Rotate objects as they are copied <Y>: [Enter]
- Setup a drawing with these parameters: MM
units, ASME-MM standard,
Standard format, A3 size, Horizontal,
Face sheet, 1:1 scale, check Pspace.
MM unit 1.0 scale, ASME-MM standard, ASM000A3
format
Insert point <options>: 0,0
You can fill in the title block now or use the the SYMCHG
command to set the attributes later.
- Use the MVIEW command to create a view of the assembly:
Command: mview
ON/OFF/Hideplot/Fit/2/3/4/Restore/<First point>: 30,40
Other corner: 170,260
Command: ms
Command: ucs
Origin/ZAxis/3point/OBject/View/X/Y/Z/Prev/Restore/Save/Del/?/: v
Command: zoom
All/Center/Dynamic/Extents/Left/Previous/Vmax/Window/Scale(X/XP):
w
First corner: -100,-300
Other corner: 45,-80
Command: ps
There are several ways to create this assembly drawing. This same
drawing could be created as a 2D drawing in model space using North
Iso view. The hardware items can be assembled directly in the SHAFT
dialogue box using Hardware Pattern on the same segment as the Hole
Pattern. Or, the 2D parts could be modeled individually and separated
far enough so that they do not overlap, otherwise the underlying parts
would have to be manually trimmed.